In March 2017, I compared my DNA raw data from Family Tree DNA against my DNA raw data from MyHeritage DNA. I had tested with FTDNA at home on Nov 25, 2016 and with MyHeritage DNA at RootsTech on Feb 10, 2017.
Since then, I ordered tests and tested at home with 23andMe on Dec 2, 2017, AncestryDNA on Dec 12, 2017, and Living DNA on June 23, 2018. So I now have five sets of my own Raw Data from different testing companies that I can compare.
You never know what the companies are doing, so just to make sure, I downloaded my Build 37 raw data from Family Tree DNA again and compared it with the download I did on Jan 12, 2017. Nothing had changed. The files were identical. That’s good.
Raw Data File Contents
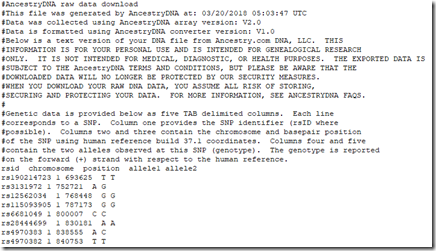
All 5 companies list your SNP (Single Nucleotide Polymorphism) data, one per line. Some companies include some lines of text description at the top, followed by a title line naming the fields, followed by the SNP data. Here for example is the beginning of my Ancestry DNA raw data file:
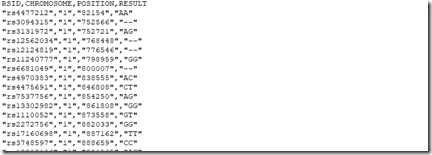
And this is the beginning of my Family Tree DNA raw data file:
Here’s a comparison of the five DNA tests I took and the raw data files I got from them:
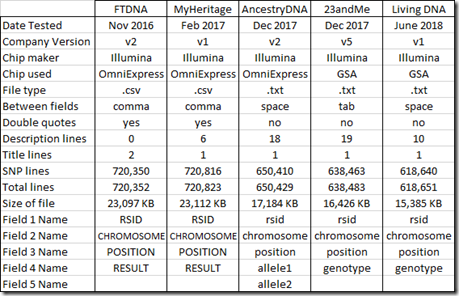
Family Tree DNA and MyHeritage DNA files are both set up similarly as .csv files (comma delimited) with field put in double quotes. The other 3 companies use plain text files separating fields with a space or tab. Both type of files can easily be loaded into Excel and the fields will be placed properly into columns for you.
The first field for each SNP in all the files is the RSID (Reference SNP cluster Identifier) which basically is a name for the SNP. I checked, and in each raw data file, no RSID was listed more than once.
The RSID is followed by the chromosome number and the position in base pairs on the forward strand that the SNP is located on the chromosome. The position of the SNP can change when the powers that be come out with a new “build” of the genome. Several years ago, Build 36 was the standard, but most companies now use Build 37. They have already come out with a Build 38, but so far all of the companies are sticking to Build 37 because it really is a lot of work to change for little gain with regards to matching people to each other. All 5 of my raw data files are from Build 37, so (theoretically at least) the chromosome and position of any SNP should match. I’ll check that later in this article in the section: “RSIDs with more than one Position”.
The value of the SNP is called “result” by Family Tree DNA and MyHeritage DNA, “allele1 and allele2” by AncestryDNA, and “genotype” by 23andMe and Living DNA. Ancestry DNA puts a space between the two allele values. The other companies list the two alleles together as a single 2 character string.
The SNPs from all five companies are listed by chromosome and then by position within the chromosome. Chromosomes 1 to 22 (the autosomes) are listed first. The sex chromosomes X and Y and the mitochondrial MT follow. Ancestry DNA numbers X as 23 and 25, Y as 24 and MT as 26. Ancestry uses 25 for the few SNPs that they probe that are in the pseudoautosomal region of the X and Y chromosomes. These are the tips of the X that actually combine with the Y chromosome just like autosomal genes do.
Family Tree DNA embeds a 2nd title line between the last SNP on the 22nd chromosome and the first SNP on the X chromosome. Don’t get caught by this. Be sure to remove this second title line if you are analyzing a Family Tree DNA raw data file in a spreadsheet or with programming.
RSIDs and SNPedia
The RSID, which you can think of as the name of the SNP, is usually represented by the letters “rs” followed by a number. The SNPedia has information on a fair percentage of these RSIDs and you can look them up to find out what that particular SNP has been found to do. For example, the entry for rs1815739 in SNPedia will tell you that this SNP is on chromosome 11 at position 66560624, is part of Gene ACTN3, and is said to have an effect on muscle performance. Values of (C,C) could contribute to better performing muscles, (C, T) is a mix of muscle types, and (T,T) could contribute to impaired muscle performance. Medical interpretation of SNPs is not something I have any experience with, so I will make no attempt to do that.
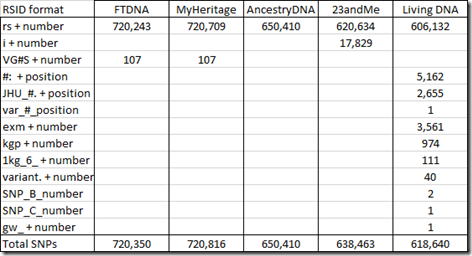
When testing companies test SNPs that do not already have an RSID defined, they often invent their own. 23andMe has used “i” followed by a number. Family Tree DNA and MyHeritage DNA have used “VG” followed by the chromosome number followed by “S” followed by a number. And Living DNA came up with a whole set of different RSID names, each of which must have some meaning to them. In my raw data, I found the following number of SNPs with these prefixes:
At the time I’m writing this, the number of SNPs defined in SNPedia is 109,335. SNPedia says that 49,082 of those are tested by Ancestry.com’s v2 platform and 24,761 by 23andMe’s v5 platform with 16,453 in common between them. There are 13,916 tested by Family Tree DNA. MyHeritage DNA and has about 12,000 entries and Living DNA has about 22,000. They say there are 1,504 SNPs of their defined SNPs that are in common to most platforms.
Number of SNPs by Chromosome
All companies read and provide raw data for the SNPs from the autosomes (chromosomes 1 to 22) as well as the X chromosome. MyHeritage DNA, Ancestry DNA and 23andMe provide Y chromosome SNPs. Ancestry DNA and 23andMe provide mitochondrial (MT) SNPs.
Below is the number of SNPs by chromosome in my raw data:
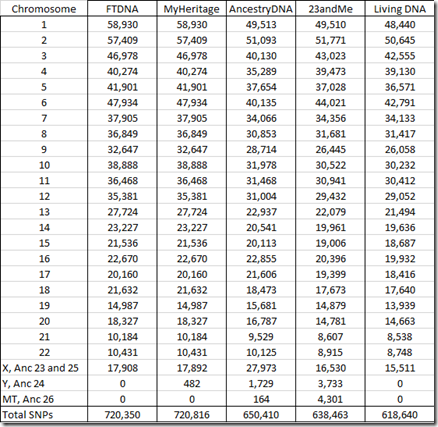
You’ll notice that the FTDNA and MyHeritage number of SNPs are identical for all chromosomes and are only 16 different for the X chromosome. That’s because both companies use the the same chip and the same Gene By Gene lab (the parent company of Family Tree DNA). Differences in the reads between the two are indicative of the error rate in one set of raw data. My analysis last year that compared the two sets of raw data found 42 differences out of 702,442 autosomal SNPs, indicating an error rate less than 0.01%. MyHeritage does include some Y chromosome results in its raw data, but Family Tree DNA does not.
Ancestry’s X Chromosome in More Detail
Ancestry divides its X data into what it calls chromosomes 23 and 25. The latter is said to represent the pseudoautosomal region which I described earlier. My 27,973 X SNPs from my Ancestry DNA raw data is made up of 27,473 chromosome 23 SNPs and just 500 pseudoautosomal chromosome 25 SNPs.
This is the range of positions and counts of my designated chromosome 23 versus chromosome 25 SNPs:
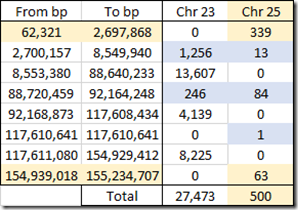
Ancestry DNA’s Chromosome 25 regions in my raw data include 339 SNPs up to position 2,697,868 which is the starting tip of the X chromosome and is the first pseudoautosomal region. And then there’s 63 SNPs at the ending tip of the chromosome in the second pseudoautosomal region.
For some reason, Ancestry DNA assigns 13 SNPs from 2,700,157 to 8,549,940 to chromosome 25 when it is outside the official region (up to 2.7 Mbp) where it also assigns 1,256 SNPs to chromosome 23. Then between 88,720,459 and 92,164,248, they have another 84 SNPs assigned to chromosome 25, and I’m not sure why.
The SNP designated 25 at position 117,610,641 in my raw data file is all alone and is likely an incorrect entry by Ancestry DNA.
138 of those Ancestry chromosome 25 SNPs are also included in my raw data from 23andMe, who simply include them as an X chromosome SNP and don’t differentiate them like Ancestry DNA does.
SNPs in common between companies
It is quite important to know how many SNPs are shared between companies. I compared my 5 sets of raw data in pairs and counted the SNPs shared. The numbers on the diagonal in bold are the number of SNPs in my raw data just from that company. The numbers below the diagonal are the number shared. The percentages above the diagonal are the percent shared out of the total SNPs that the two companies have = #shared / (#c1 + #c2 – #shared)
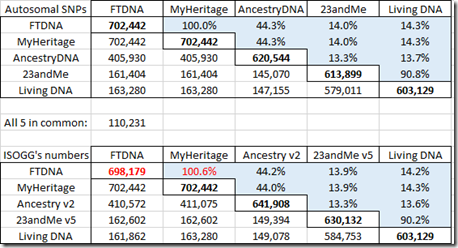
The first table shows the shared autosomal SNPs that I have between my raw data files from the five companies.
Below that are the comparable numbers from the Autosomal SNP comparison chart at the ISOGG Wiki. The FTDNA number 698,179 that I’ve marked in their chart has to be wrong because it can’t be less than the number FTDNA shares with MyHeritage. The numbers are fairly close to mine. I know from looking at several different people’s raw data from Family Tree DNA, that there is variation in the number of SNPs included in one company’s raw data from test to test.
Family Tree DNA and MyHeritage DNA provide identical autosomal SNPs. They share about 44% with AncestryDNA. 23andMe and Living DNA who both use the v5 chip share over 90% with each other, but only about 14% with the other companies. Only 110,231 autosomal SNPs were included in my raw data by all five companies.
Those low overlap percentages are what makes it difficult to find matching segments between data from the v5 chip and data from the old chip. Some companies like Family Tree DNA do not yet accept transfers of raw data from 23andMe or Living DNA because of that. MyHeritage DNA uses imputation to estimate the missing SNPs. GEDmatch is still working to develop a more reliable method to compare v5 chip data with earlier data through it’s GEDmatch Genesis project.
Here’s the same data, but for the X chromosome:
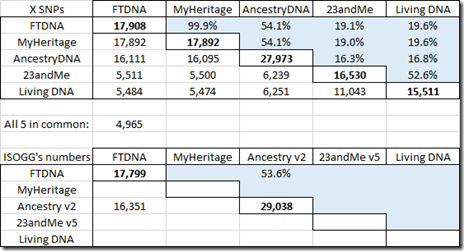
The ISOGG Wiki doesn’t yet have X data in their table for MyHeritage DNA, Living DNA or the new v5 chip of 23andMe.
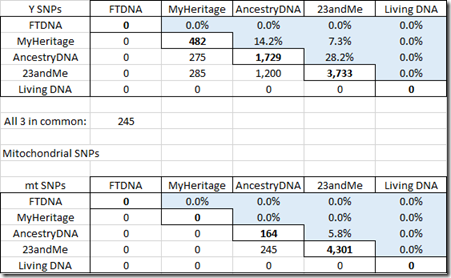
Here are my tables for the Y chromosome and for mitochondrial.
RSIDs with more than one Position
All my raw data files were from Build 37 of the genome. So every RSID should map to one SNP on one specific chromosome at one position. That was true within any one set of raw data, where every RSID was just given once.
But once you combine multiple sets of raw data, you’ll find the same RSID tested in different files. This is the count of the number of RSIDs by the number of files each was found in:
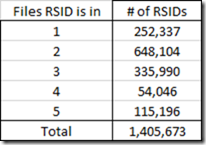
So you would expect those RSIDs that are in more than one raw data file to be at the same position on the same chromosome in each file. It turns out that in my files 68 of those RSIDs are not at exactly the same position.
All but 1 are differences with the 23andMe raw data. And most of them are minor.
29 differences have the 23andMe position being just 1 less than the Living DNA position, e.g. RSID rs498648 is on chromosome 1. In my 23andMe raw data file it is at position 176,957,452 and in my Living DNA file, it is at position 176,957,453. Now this is just 1 position different and isn’t important at all for genealogical purposes. But for a programmer who may want to develop tools for handling raw data, even a one difference can cause a problem. None of these 29 differences have RSIDs that are in the other 3 raw data files or in SNPedia, so I can’t tell which one might be the correct one.
34 of the differences are very small ones on the mt chromosome where 23andMe is 1 more (31 times), or 2 more (twice) or 3 more (once) than the Ancestry DNA position. e.g. for RSID rs118203886 Ancestry DNA lists position 611 on chromosome 26, and 23andMe lists position 613 on chromosome MT. Of these RSIDs, 32 are listed in SNPedia and SNPedia agrees with Ancestry DNA in all cases.
One more difference is SNP rs3857360 which is in both my Family Tree DNA and my MyHeritage DNA raw data files as position 102,989,428 on chromosome 5, but has a position one higher at 23andMe. This SNP is not in SNPedia.
But there are four differences between 23andMe and Living DNA that concern me the most because the RSID is used for two completely different locations. These 4 are:

Two of the values at 23andMe are no-calls, but of the other two, one doesn’t match with a TT at 23andMe and a AA at Living DNA. That already is indicative that these might be different SNPs that one of the companies has named incorrectly. None of these four SNPs are in SNPedia.
Positions with more than one RSID
So there were only 68 RSIDs with different positions, and only 4 of them were bad.
However, there are many more positions that have more than one RSID.
I found quite a number of SNPs on a chromosome at a specific position, where a different RSID was used for that SNP.
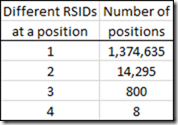
From my 5 raw data files, I had as many as 4 different RSIDs at a specific position.
For example, Chromosome 7, position 117,174,424 has these RSIDs:
- rs78440224 in AncestryDNA and Living DNA raw data
- i5010947 in 23andMe raw data
- i5053851 in 23andMe raw data
- VG07S45007 in Family Tree DNA and MyHeritage DNA raw data.
And if you look up rs78440224 in SNPedia, sure enough, they say that SNP is named i5010947 and i5053851 by 23andMe. It doesn’t happen to mention the fourth name though. (And I was happy to see that all four of those SNPs in my raw data have the value GG, which is not the cystic fibrosis carrier.)
The i5010947 and i5053851 RSIDs in the 23andMe raw data file means that there are two names for the same SNP in the same file. Cases like this will cause the position to occur more than once in the raw data file.
Analysis of the Allele Values
This is what we’ve really been trying to get to. Let’s first see what the allele values there are from each company.
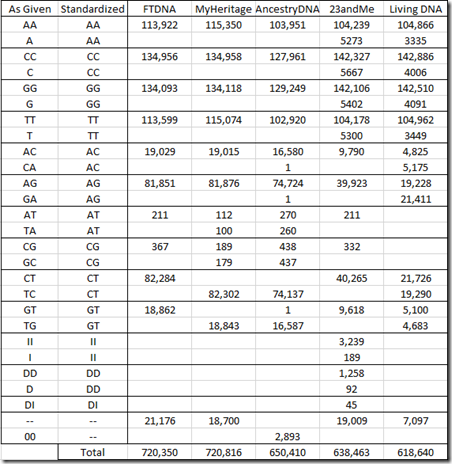
The allele pair corresponding to the alleles on the forward strand of both parents’ chromosomes is given as two letters, with A, C, G and T being the possible choices. Ancestry lists the two alleles as two separate letters, but I’ve put them together in the above table.
Since it is unknown which of the two letters belongs to which parent, the order of display of the two letters is arbitrary. The standard practice is to order the two letters alphabetically, so if you have the choice of AC or CA, then you would use AC. For the most part, the companies follow this standard, but you can see very odd exceptions., e.g. MyHeritage DNA and AncestryDNA both using TC and TG instead of CT and GT. Living DNA often uses both orderings, and unless they’ve thought up something innovative, I doubt the order for a specific value means anything.
23andMe includes values for insertions (II) and deletions (DD) and even has a few deletion/insertions (DI).
Two dashes “–“ represent no-calls. These are positions where the values were not able to be determined. AncestryDNA uses two zeros: “00”. For matching purposes, no calls are treated as a match.
When a single letter is given, it is for a chromosome that is not in a pair. Since I’m a male, I have a single X chromosome from my mother and a single Y from my father and everybody’s mt chromosome comes just from their mother. 23andMe uses the single letter designation in this case, but the other companies duplicate the letter.
In order to compare allele values between companies to see if the readings are the same (in the next section), I’ll need to standardize the notation. I’ve chosen to use 2 letters and order them alphabetically as in the “Standardized” column of the above table.
When a value cannot be determined during the test, it is given what is known as a no call and is denoted by two hyphens by most companies, but by a zero by AncestryDNA. The percentage of no calls is a very important statistic and indicates the quality of the test results. A no call percentage of 3% or more is on the high side and the company may be willing to get new results from your sample or get you to re-test. My results from the five companies ranges from a low of 0.4% no calls at AncestryDNA to a high of 3.0% at 23andMe.
Below is my standardized table of counts for my autosomal chromosomes:
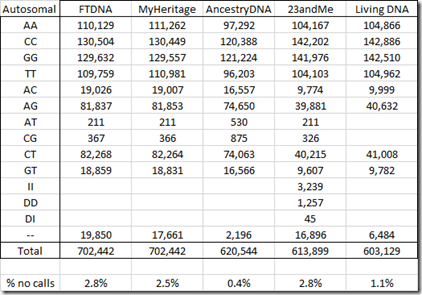
It’s interesting that Living DNA did not find any AT or CG values.
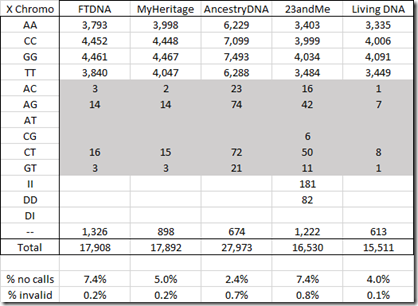
For the X chromosome below, I’ve marked the invalid values. Since I’m male and I only have one X chromosome, values with two different letters are impossible.
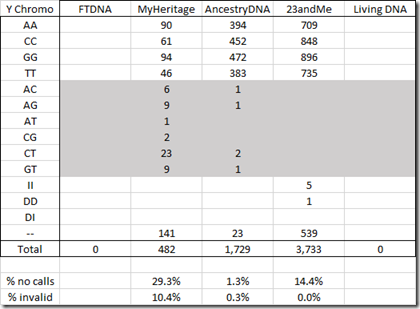
Next is the Y chromosome. There is a high number of no calls and invalids in the MyHeritage Y DNA data.
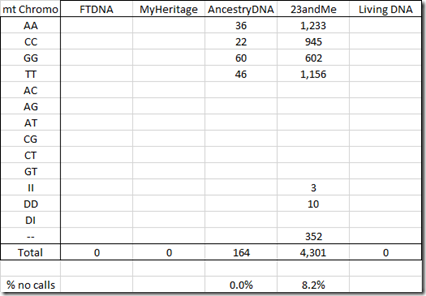
Only AncestryDNA and 23andMe include the mt chromosome in the raw data:
Comparing reads between companies
Now the interesting question. Do the different companies give the same values?
To do this, I re-sorted my combined file of results by chromosome and position, and merged the results for identical positions (SNPs with different RSIDs) together. If any of the readings of the SNPs at the same position conflicted, I was prepared to mark the value at the position as a no-call, but fortunately none did.
I did my analysis and summarized it with the following table:
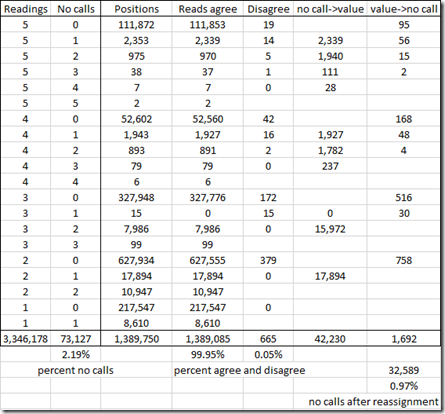
So this table includes the 1,389,750 unique positions that were tested by my five companies. There were 3,346,178 readings in total, so that’s an average of 2.4 readings per position.
I’ve grouped the positions by the number of companies that read from that position from my five sets of raw data and the by the number of those reads that were no calls.
For example, the first line says that 111,872 positions were read by all five companies. Only 19 of those have a disagreement among the 5 companies. For those 19 positions where there are disagreements, I would change the value to a no call, so 19 x 5 = 95 values will get changed to a no call.
The second line says that 2,353 positions were read by all five companies, but in each case one of the companies had a no call. Only 14 of those have a disagreement among the 5 companies. A no call does not count as a disagreement. For the 2,339 agreements, the no call can be given the value that the other companies agreed upon. For the 14 positions where there are disagreements, I would change the value to a no call, so 14 x 4 = 56 values will get changed to a no call.
In total, there are only disagreements between 2 or more companies at 665 positions, which is only 0.05%. That’s very good!
By doing this, I can assign 42,230 values to no call readings and only have to assign no calls to 1,692 readings. That reduces the number of no call readings from 73,127 to 73,127 – 42,230 + 1,692 = 32,589. So I have effectively reduced my percentage of no calls down from 2.19% to 0.97% of the readings the companies supplied to me.
Creating a combined raw data file
Well, it seems like I should take the next step and create a raw data file from these 1,389,750 positions.
I noted, but forgot to correct my X’s and Y’s earlier that were impossible values for me because they were not double letters. So that adds 304 no calls to my X values and 57 no calls to my Y values.
Here’s a summary of what I’ve got, with a comparison of what I got from the five sets of raw data from the five companies. My percent no calls is shown on the bottom line.
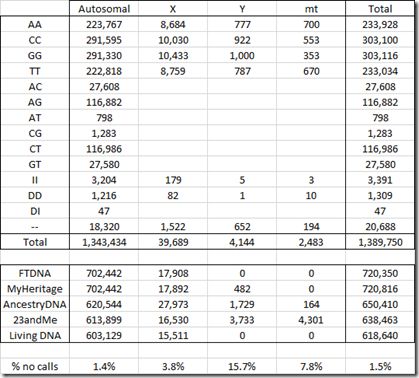
Note that 23andMe gave me 4,301 mt readings but I only have 2,483. That’s because 23andMe’s mt data included many SNPs with identical positions and I merged SNPs with the same position into one. In all cases, the SNPs that got merged all had the same value.
Now which company’s raw data should I emulate? The goal would be to create a raw data file that other utilities can read. Since I’ve got v5 chip data, I likely should use either 23andMe or Living DNA’s format. 23andMe is the only company that includes insertions and deletions, so I’ll use their format and follow 23andMe’s naming convention and name the file: genome_Louis_Kessler_v5_Full_20180831124000.txt.
23andMe uses tabs rather than spaces in between fields, so I used my text editor and converted all the spaces to tabs.
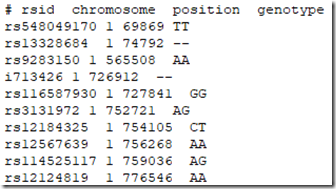
The first 10 data lines in the original 23andMe data file I got from them were:
And the first 10 lines of the file I have manufactured are:
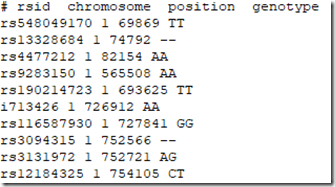
Note there are extra SNPs from the other companies, and that SNP i713426 whose value was a no call in the 23andMe file is now filled in because the value AA was provided to me by Living DNA.
So this file is 35 MB in size and has 1,389,770 lines that include my 1,389,750 SNPs plus 19 description lines and one title line at the top.
And if you’re curious, the Excel file that I used to do all this analysis for this article is 186 MB in size.
Uploading to GEDmatch Genesis
I entered the file upload information and pressed the Upload button.

It would not take the first file I tried uploading. I compared it to my raw data file from 23andMe file and noticed that my file was UTF8 with a byte order mark at the front of it. I saved the file as ANSI/ASCII file and then GEDmatch Genesis accepted it without error and identified it as a 23andMe kit type V3.
I’m not sure what I’ll do with it yet on GEDmatch Genesis, Maybe I’ll determine how it compares there with my 23andMe kit that I uploaded there back in January.
Any suggestions?
Meanwhile…Full Genome!!!
A full genome for less than $1000. That was the magic goal that labs had been trying to achieve.
A couple of days ago, while researching information for this article, I discovered an unbelievable deal by Dante Labs. They currently are offering Whole Genome Sequencing 30x marked down to $499 from $1000. I don’t know if that price is permanent or not, but it may be. They currently have a coupon code Dazzle4Rare you can use at checkout to save another $100. Global shipping is free.
That Dante Labs deal is so good, I couldn’t resist so I purchased a whole genome sequence for myself for just $399. I should get the test kit next week and then it will take about 10 weeks to process after the lab gets my sample.
Apparently during Amazon Prime Day, they offered it for $349.
So once I get the results back, I’ll see if I can compare my 1,389,770 SNPs that I put together here with the same alleles in my full genome and see what it tells me.
—
Followup: Sept 4, 2018: I was informed that in the last year or so, MyHeritage DNA stopped reporting about 30,000 SNPs from their tests and includes them now in your raw data as no calls. If I did the test again, I now might get close to 50,000 no calls (6.9%) rather than the 18,700 (2.6%) that I observed.
—
Followup: June 5, 2020: I updated the first table comparing my 5 raw data files to include the date I took them and the chip that was used.
—
Followup: Nov 11, 2021: Readers of this article might also be interested in my article from Apr 10, 2020: Determining the Accuracy of DNA Tests






 Feedspot 100 Best Genealogy Blogs


